Category Archives: Music

Musicians and the Etiquette of Not Being Paid

Sometimes musicians are asked to perform without being paid, whether live or on an album.  The request can come from a venue, other bands, or musicians, and can stipulate (or not) what they get instead. I can’t address every situation here but can give some perspective on what is okay and not okay to say and do.

Once Asked

MoneybagIf you’re asked, I recommend asking why they’re requesting that, not to put them on the defensive, but to avoid a misunderstanding.  You don’t want to end up resenting them because you’ve gotten it into your head that you’re being taken advantage of, for example.  It may help to understand their situation.  Maybe they’re already spending all they can on the album, for example, and will never recoup anyway, so they’re trying to mitigate losses, not maximize profits (for themselves at your expense)

When I Ask

If you’re asking someone, you may want to tell them upfront why you’re asking.  Here’s some of what I tell musicians:

  • I’m a solo artist and therefore pay all studio costs (rehearsal, recording, mixing, mastering), which is typically over $5000 per album
  • If this were a band with four equal members, I’d only have to pay $1250.  You’d be paying $1250, too.  Instead, you pay nothing.
  • I pay all manufacturing, distribution, and promotional costs (which can vary in cost but is typically thousands more).  You pay nothing.
  • So while you’re not being paid, you’re also not paying anything.
  • If I also had to pay each performer, let’s say $1000 to perform on all tracks, that would be an additional $3000, making the album cost over $10,000.  I simply can’t afford that.  I don’t recoup costs from sales because that’s very hard to do with instrumental music (or even other genres).  Here’s how it would look financially:
    • Each musician’s figure: plus $1000
    • Studios figures: plus thousands
    • Cover artist’s figure: plus $1000
    • Photographer’s figure: plus $300
    • My figure: minus $10,000

In other words, everyone profits but me. I need to mitigate my losses.  The musicians no longer profit up front but get to be on an album (assuming they want to be) without having to pay to be on it, and I lose less.  Personally, I feel that either me and that performer are doing each other a favor, or neither of us are.

To be honest, this is a great reason not to be a solo artist!

Once You Agree

"Moshkill" Video

My video for “Moshkill” from NOW WEAPONIZED!

If you agree to perform for free, you shouldn’t bring that up again for that project, whether it’s a show or an album. An agreement is an agreement.  In some places it’s a verbal contract. Asking to be paid, or complaining that you’re not being paid, is not only putting the other person in a terrible position, but is just not right.

Of great importance is that contributing your services for free does not mean being unprofessional or acquiring special privileges unless those were also agreed upon in advance.  For example, a singer who was very far behind on the recording schedule once resentfully told me he’d take as long as he damn well pleased to complete the project because “you aren’t paying me”.  He wasn’t around much longer.

Coda

It always pays to behave professionally and like an adult, even if you are neither. Money is a frequent subject bands can fight over, so being upfront about expectations and the reasons for everything will help you keep projects moving forward while not ruining your relationships with people.

Follow Me

Official Site: http://www.randyellefson.com
Twitter: http://twitter.com/randyellefson
Facebook (as guitarist): https://www.facebook.com/pages/Randy-Ellefson-Guitarist
FaceBook (as author): www.facebook.com/RandyEllefsonAuthor
YouTube: www.youtube.com/RandyEllefson

My Experience with Tendonitis

After playing electric and acoustic guitar for years, I took up classical guitar in college. The only problem was having two years of music school left, and now four years of playing requirements to catch up on. I managed to graduate on time anyway, but the result of so much practice wasn’t pretty.

A year later, the tendinitis (also spelled “tendonitis”) silently building in both arms suddenly came to life in August 1996. Within months, I lost my job, all guitar playing, classical composition, typing and the fiction, every career and postgraduate plan, friends, savings, hobbies, pretty much everything. Temporarily crippled and unable to use my arms, I was unemployed for a year, sinking slowly into debt, and only partially able to take care of myself. Having lost the music and fiction were the least of my problems. I lost 2 1/2 years of my life to it.

Six months into it, I bought a dictation program that allowed me to dictate text and control the computer by voice (a foot mouse helped). Restricted in the rest of life but free through the dictation program, I spent all day on the computer learning every kind of program available and working on fiction. I also found a private physical therapist who, with her assistant, began successfully treating the injury and establishing at-home treatment. My HMO, which had been unable to help, refused to pay for a thing.

After a year, I met a photographer in need of a part-time assistant. She was a great employer for the disabled, allowing impromptu breaks when the injury flared and whatever hours I could manage (less than 20 a week). Even this caused acute pain and prevented any other activities…or healing. Working to pay unavoidable bills hurt my arms more, requiring more physical therapy that cost more money, which I had to work still more hours to acquire. It was a bad cycle.

My arms needed rest, which meant never using them again on a job at even a normal activity level, but realistically, how many jobs did that leave? The prospects weren’t good, and watching friends move on with their lives while mine had ground to a halt wasn’t pleasant.

Fortunately, me and the photographer stumbled into the solution when we realized she needed a database to track her photographs. Being somewhat hyper-creative, I jumped in to do it without realizing what I was getting myself into, but the classical training had prepared me for all that disciplined thinking. I did the design work with a regular mouse, which I put on the floor and used with my feet. Any writing of text was done with the dictation program. My physical therapist learned of this and asked me to design one for her, bartering hours worked against free physical therapy appointments. That’s when I realized this was it: the career that didn’t use my arms was programming.

This realization, in May of 1998, led to a programming course and self-study. Things were looking up, too, as my playing improved more and therapy appointments went from weekly to every two weeks, then three over the summer. The constant pain was gone, as was the ease with which a flare up could be caused. In fact, only one consistent pain remained, but the unthinkable cause wasn’t learned until early September 1998: the therapist found an entirely new case of tendinitis in each arm, this time on the inside of both instead of the outside. Incredibly, there were now four cases of tendinitis.

How could this happen? I still used my arms far less than a normal person, but still developed an overuse injury. How? My weakened arms, which came close to atrophying from disuse at one point, could handle so little that even a fraction of normal use was too much and amounted to overuse. And there’s no way to distinguish the forearm pain of an existing case from an approaching one. They’re both forearm pain in the same general area. The very subtle warning signs were masked by the pre-existing case.

Shocked, I realized there was a permanent danger of new injuries, a sobering fact that forced long term adaptations like finally buying the foot mouse, which my finances couldn’t afford but for which my arms could no longer wait. For the second time, the guitar playing disappeared when it hadn’t even fully recovered.

The professional job search started immediately to move away from freelancing, and within six months, I succeeded in March of 1999. I was quite literally saved. Using the foot mouse and dictation program at work, my arms got the rest they needed and started recovering rapidly. By 2000, regular physical therapy appointments ended. The financial situation improved dramatically, making it easy to change the life I’d had over 2 years to think about. Like many who’ve had their life taken from them and get another chance, I was determined to live it better. By May 2001, I was recording instrumentals again, and in early 2002, built a new home studio in which I recorded the debut album.

"Moshkill" Video

My video for “Moshkill” from NOW WEAPONIZED!

As of 2010, I no longer use a special mouse, the dictation program, or do any treatment for my arms.  This means no ice, heat, exercises, or even stretching except once in a while, and my playing time restrictions are pretty small. I’ve also been able to play softball (as a pitcher no less) and started playing drums, albeit lightly! With enough time and rest, anything is possible.

Follow Me

Official Site: http://www.randyellefson.com
Twitter: http://twitter.com/randyellefson
Facebook (as guitarist): https://www.facebook.com/pages/Randy-Ellefson-Guitarist
FaceBook (as author): www.facebook.com/RandyEllefsonAuthor
YouTube: www.youtube.com/RandyEllefson

Got Tendonitis? What To Do

Like most guitarists, I never thought I’d get tendonitis, not to mention several times. One side effect is that, since launching my music career, I’ve fielded hundreds of questions about it. These range from how to avoid it, diagnose it, get treatment (and from whom), do home therapy, and continue with playing – and more importantly, get on with life.

The goal of this article is to enable you to take your first informed steps when you suspect you’re injured, but since I’m not a doctor or other medical professional, I don’t give out details of treatment. You’ll have to consult a medical professional for that.

What To Do Now

If you have pain, muscle tightness, or soreness now, you should stop playing guitar now until a medical professional assesses your situation. Otherwise it will just get worse. You should also avoid unnecessary arm activities like sports, lifting, or heavy computer use.

If the pain goes away after some time off, it may still return when you resume action, so see a doctor anyway. It is much easier to prevent this than to deal with it (see under “Perspective” below).

Insurance

To see any professional aside from a doctor, your health insurance (such as an HMO) might require you to see a doctor first and get a referral. Without one, your insurance may refuse to pay for your treatment.

Medical Professionals

There are many medical professionals who can diagnose and treat tendonitis, but some are more effective than others. Your primary resources are doctors and physical therapists, but in either case it’s important to have someone who seems competent and informed about tendonitis. If they sound hesitant, unsure, or dismissive, get a second opinion.

Doctors generally see people once or twice about an issue, not the many times often needed for something like tendonitis. It is a repetitive stress injury that needs repetitive attention to heal. A multitude of appointments is more typical of physical therapy.

Acupuncture and acupressure are secondary options of less certain benefit, and a chiropractor is not likely to help you unless existing neck trauma, for example, is exacerbating your arms.

Doctors

You should first see your doctor partly because they know your general health and can ascertain whether other factors play a role in your symptoms or not. A doctor can also confirm whether it is tendonitis or something similar, such as carpal tunnel syndrome, arthritis, or trigger finger. They can also diagnose severity and which type of tendonitis it is (lateral or medial).

A doctor may prescribe anti-inflammatories stronger than the over the counter variety and provide or recommend removable arm braces. He may recommend ice, heat, or both, and advise you on how and when to do these. Doctors will sometimes want to administer a cortisone shot directly into the forearm muscles during this appointment. Personally I did not find this effective and refused a second shot weeks later because it made symptoms worse.

If the doctor says you have tendonitis, ask them to recommend a physical therapist, preferably one with experience with tendonitis. Be forewarned that some physicians do not believe physical therapy can help with anything at all and be dismissive of its value. This is often not caused by knowledge of therapy but contempt for some treatments (also including acupuncture and acupressure) popularized after the doctor’s initial education. You might want to find yourself a more enlightened doctor in general, not just in regard to tendonitis.

Physical Therapists (PT)

Physical therapists are specifically trained to diagnose and treat tendonitis and muscle injuries. That said, you should see a doctor first anyway (see above). Compared to a general practitioner doctor, qualified physical therapists are specialists.

They offer various kinds of treatments done while you lay down on a massage table:

  • Manual therapy – This involves the PT positioning your arm and wrist in various positions to maneuver muscles, thereby revealing to the PT’s trained fingers the muscle problems needing resolution. Hard pressure via fingers releases the knots, which feel tender and sore even before this. With some practice you can learn to do this yourself, but save that for later.
  • Ultrasound – Just like what they use to see a baby in the womb but without the graphics, ultrasound is used to penetrate heat deep into the arm to increase blood flow (oxygen) to the wounded muscles.
  • Electric stimulation – A pair of small pads are placed on the arm with electric current passing in between and through the muscles to cause contraction. The PT continues with manual therapy during this.
  • Home therapy – Since you must be an active participant in your recovery, there are many activities you must do outside of the physical therapist’s office. These may include stretching exercises, forearm curl exercises, and how and when to do ice and heat (and the purpose of each). They can also advise you on anti-inflammatories, vitamins, and topical pain gels.
  • Device recommendations – There are a multitude of arm bands and braces available to either immobilize your arm to aid recovery, or lessen the strain on the injury during common daily tasks. Alternate computer accessories are also available. A physical therapist can recommend which ones to get and use under what circumstances.
  • Behavior modification – There are things you might be doing to unknowingly contribute to the injury, such as your position while playing an instrument or using a computer. You might even be sleeping on one of your arms at night, applying pressure to the now inflamed joint. Your physical therapist should discuss these things with you to help you avoid straining the injury.

Perspective

Sometimes I hear people complain about not playing guitar a few days or weeks when their arms first hurt, so to help your perspective, here are some details on my situation. I could not play at all for an entire year, then could play really simple music for 30 minutes, twice a week. Three months later I reached 90 minutes every other day and slightly harder music. At two years I developed a second case of tendonitis in both arms and started over. After five years, I was up to 2-3 hours at once, still alternating days on and off, and could finally play most of my own music. It wasn’t until 8 years passed that I could play guitar two days in a row, with one day being a “light day” of easier music, though I could get away with up to 6 hours at once, depending on complexity. It is now 10 years later, and three days in a row is still unwise.

These numbers are rough, but I received physical therapy once a week for about five years, sometimes more often, sometimes less, and slowly tapered off to nothing after about 8 years. I did stretching for 9 years, heat for 9, ice for 8, ibuprofen for 7, vitamins for 3, slept in arm bands for 3, and used a foot mouse in place of a hand mouse for 5 years, and a dictation program for most typing (especially heavy) for 8 years.

In short, tendonitis does not affect only your guitar playing, but can impact every activity you use them for, including things you take for granted like sleeping, dressing, grooming, driving a car, opening things, and even how you are perceived by others. After all, there’s still contempt for the seriousness of the injury and some people will disrespect you for having it.

Coda

"Moshkill" Video

My video for “Moshkill” from NOW WEAPONIZED!

If your arms are already bothering you, getting treatment sooner is much better than later. With lifestyle adjustments and good treatment, it is possible to live your life pretty well, albeit differently. It just takes time and rest, and sometimes a lot of both. The impatience you exhibited in over-using your arms may now force you to learn patience the really hard way.

Follow Me

Official Site: http://www.randyellefson.com
Twitter: http://twitter.com/randyellefson
Facebook (as guitarist): https://www.facebook.com/pages/Randy-Ellefson-Guitarist
FaceBook (as author): www.facebook.com/RandyEllefsonAuthor
YouTube: www.youtube.com/RandyEllefson

Double-Tracking Lead Guitars, Part 2

Last time we discussed double-tracking problems you can avoid by doing Guitar 1 well, so this time we’ll cover the same for Guitar 2, with more modern home studio audio recording techniques and tips to help you record your guitar solos.

Aside from the difficulties mentioned under “Performance Issues” below, there are some disadvantages to double-tracking:

  • Some people feel a doubled performance has less character
  • It takes longer to record (which may mean more money)
  • If you don’t double track something challenging, other guitarists may assume you couldn’t
  • Mixing becomes more difficult if you want your rhythm parts to be heard clearly

Let’s tackle these one by one. It’s true that individual character can be overshadowed, but this will depend largely on your style. More improvisational players are more affected, but some find it easy to play something repeatedly. It’s a judgment call only you can make. In exchange for some individuality, you get a thicker, fuller sound. One or the other will be worth its weight in gold to you.

If you record in your own studio, the extra time for double-tracking won’t cost more money, but in either case, consider this: if it takes you 20 minutes to record Guitar 1, it will not take you another 20 minutes to record Guitar 2. In my experience, it takes a quarter of the time for Guitar 2 (5 minutes). This happens because your playing is already smoking by the time Guitar 1 is done. If you’re not improvising, you’ve also been playing the same line for 20 minutes.

As for guitarists assuming you couldn’t double track something, not every guitarist has this competitive attitude. Many are just good musicians who, like you (hopefully), care more about the song than their ego.

Mixing Issues

Problem: Muddled mix. If you’re a metal head, the traditional mixing approach is riffs hard-panned right and left, lead guitar straight up the middle, but the whole point of double-tracking is to have full stereo leads, usually hard panned, too. Now you’ve buried your rhythm section!

Solutions:

  • Be nice to your mixing engineer and make sure he knows what you want, for his skills can keep an interesting riff audible beneath double-tracked leads, using a combination of compression, tone tweaking, riding the faders, and careful use of that big reverb/delay you have on that solo
  • A well-chosen lead tone will help it stand out without burying your riffs
  • Write a simple rhythm section so there’s nothing to miss. If you’re the only guitarist, your bassist must hold down the riffs alone live anyway, so you may as well go for simple chords under your solo. For songs with vocals and a lone guitarist, this is the traditional approach
  • Double-track leads over simple chords, but single-track leads when the riffs are interesting

Problem: Mix balance during harmonies and dual-lead lines. If Guitars 1and 2 play in unison and then break into harmony, or into two completely different lines (Guitar 1 is a slow melody while Guitar 2 is a fast scale), both guitars may sound quieter overall.

Solutions: Both issues can be solved by double-tracking the original lead all the way (Guitars 1 and 2), then make the harmony/dual part into Guitar 3 (and maybe Guitar 4, if you double-track this, too). Be aware that you’re more likely to bury the riffs this way. A lesser solution is to raise the volume where needed, though this doesn’t always work.

Performance Issues

In the previous column, I mentioned using two different articulations for Guitars 1 and 2, in which case the performance will not be exact by definition. If you use the pick throughout Guitar 1 but use slurs within Guitar 2, for example, you may have to experiment with exactly what is different (and when) to make this sound good with full stereo separation. Sometimes there’s no choice but to put both guitars in the middle of the mix instead.

Problem: Timing. This is the most obvious issue with double tracking and is why most people don’t do it.

Solutions: Practice. Guitarists practice all sorts of things with a metronome, but you need to practice double tracking itself. There’s nothing like playing along with yourself to discover how inaccurate your timing is. You need to learn your own habits to fix them.

  • Find a rhythm guitar part (or entire song) with a fair amount of activity. What you need is something with both steady motion and briefly held chords, preferably in alternation. The reason is that you may speed up or slow down when switching. If the rhythm part is constant 16th notes, that won’t help much. Neither will long held chords. Without using a drum machine or click track, record yourself playing the rhythm(s) for several minutes. Then put on the headphones and double track it. Pay attention to every place where you rushed (or are rushing now). If you realize the original performance was bad, redo Guitar 1, then try doing Guitar 2 again. Keep doing it until you succeed or get better
  • Do it with many songs, harder songs, with lead guitar, and finally with a drum beat
  • Do it for weeks, months, and years. When you eventually lay down a smoking, complicated guitar part and then double it exactly before everyone’s stunned ears, no one needs to know how much you practiced

Problem: Headphones are cramping your style. Whether ear fatigue, the cord getting in the way of your windmills, or just a fashion emergency, headphones can drive people crazy when recording, so how do you double-track without them?

Solutions:

  • Don’t use them during Guitar 1, just during Guitar 2
  • Don’t use headphones during recording, only during playback to verify the guitars match. This can be tricky while playing (too many sounds might be bouncing around in the room, making it hard to focus)
  • After recording Guitar 1, turn off Guitar 1 altogether while performing Guitar 2 “blind” and without headphones. Verify they match during playback, using headphones. This is tricky but impresses witnesses. If you’re getting frustrated and/or feel your spontaneity is going away, this can also make you feel free again

Problem: Guitar 2 out of tune. Sometimes the guitar just goes out and you can’t get it back in tune with Guitar 1. Now what?

Solutions:

  • Recording Guitar 2 ASAP after Guitar 1 helps avoid this, but not always
  • If the performance has extreme bends at the end, record right up to that note, stop short of it, do the double tracking, then add the bend to both tracks via punch-in afterwards
  • Sometimes only a few pitches are off, so just record Guitar 2, then re-tune the offending notes and re-perform them via punch-in
  • If the notes on only one string are off, play those notes on a string that’s in tune. This may change the tone, however
  • If the notes are flat, you can try slightly bending them up when playing, but this may not work either because the note goes by too quickly or because you’re doing vibrato or something else while sitting on that note
  • The culprit might be the riffs, which can sound perfect until you play lead over them and a slightly bent string in the riff causes this
  • If all of Guitar 2 is out, you can save Guitar 1 and do another Guitar 1 and then Guitar 2. Otherwise, erase Guitar 1 and start over
  • Finally, you can always try for Guitar 2 on another day, but you may play differently then. In 20 years, I don’t think I’ve ever once doubled something more than one hour after I did Guitar 1

Problem: Final note doesn’t end at the same time. Sometimes you let go off the last note at different times for each guitar, or one has better sustain. We’re not talking huge differences here, but even small ones can sound bad, especially if there’s a rest in the whole band right then or your digital delay repeats the two slightly-off endings over and over!

Solutions:

  • Re-perform it. This is not good if the performance was otherwise great. Besides, you may miss again
  • Punch-in just to fix that. A good bet, though you can still miss
  • Fix it in the mix. Use the automation features of your recording system, ala ProTools, to mute the note that goes longer so it ends when you want it to. If your signal routing is set-up right, when you mute the offending guitar, its last note will still go into the delay unit to avoid an unnatural cut-off there. And yes, this is cheating, but so is punching in. To be accurate, mute both leads at once by grouping them. Your mixing engineer may have other solutions, such as fading out the notes before they end

To Double-Track Or Not To Double-Track

Video for "Crunch Time"

My video for “Crunch Time” from NOW WEAPONIZED!

If you decide to double-track certain lead phrases and not others, it is good to know this in advance. After all, let’s say you decided to double something, did so, and change your mind later? Simple. You just turn off one guitar. But what if you didn’t double it and now wished you had? Can you get the gear set up (if it’s gone) and re-perform it days or weeks later? My solution is simply to double everything and make my decisions during mixing, but I own my studio and am a glutton for punishment.

So is double-tracking worth it? Here’s a final thought. It often sounds good to double your themes, which tend to be simple and easier, and not double your more solo-like passages. You keep spontaneity where you need it and get fuller sounding themes. It’s the best of both worlds.

Best of luck, and may your fingers fly true…both times.

Follow Me

Official Site: http://www.randyellefson.com
Twitter: http://twitter.com/randyellefson
Facebook (as guitarist): https://www.facebook.com/pages/Randy-Ellefson-Guitarist
FaceBook (as author): www.facebook.com/RandyEllefsonAuthor
YouTube: www.youtube.com/RandyEllefson

Double-Tracking Lead Guitars, Part 1

In an age when few want to play lead guitar at all, not to mention twice, an article on double-tracking guitar solos might seem pointless, but for those players keeping the faith, this one’s for you.

We’ll discuss the pros and cons of double-tracking lead guitars and ways to get around common problems. For those new to the concept, double-tracking is when the guitarist performs and records the same exact part twice, usually turning one performance to the left side of the mix and the other to the right. It’s frequently done for rhythm guitars, but less often with leads. What follows are some modern home studio audio recording techniques and tips to help you record these guitar solos.

How To Do It

First off, why double track? Lots of reasons:

  • Two guitars performing the same thing sounds fuller (like a chorus compared to a single voice)
  • Alternating between doubled and single-guitar creates variation
  • You can use two different guitar sounds for a new tone
  • You can use two different articulations (one legato, one staccato)
  • After a decade of no guitar solos in popular music, we have to double-up to make up for lost time
  • Impress other guitarists

If all of that sounds good to you (and I know the last one does), here’s how to do it.

The Method

For starters, you should be able to play the lead part note for note, so take some time to memorize it. Some feel this will rob their lead playing of spontaneity, but if you feel this is true, just improvise your first performance (“Guitar 1”) and then learn it for the doubling (“Guitar 2”).

In theory, double-tracking is simple. Just record Guitar 1 like any other lead part, then turn Guitar 1 all the way to the left (or right). Turn the live Guitar 2 to the other side. Then, wearing headphones, listen closely to Guitar 1 while recording Guitar 2. That’s it!

Problems and Solutions

If that sounds too easy, you’re right. There are a lot of problems to worry about, but you can avoid some by doing Guitar 1 well, so we’ll focus on that first.

When you record Guitar 1, be sure that there are no strange anomalies within your phrasing or timing that you cannot duplicate. The tremolo bar is a good example. You’ve got to repeat any dive bombs or other tricks exactly later. Pinch-harmonics are another problem, as it’s hard to get the exact harmonic you want. Any harmonic will often do the trick, too, so you’ve probably learned to not care which one you get. The good news is that getting a different harmonic (or none at all) on Guitar 2 can work fine or be better. I did this on purpose on “Still at Large” from my album, The Firebard.

Play the clip.

Slides can be easier, since they’re sloppy anyway, but that only helps with fast slides. These should start from the same place (roughly) and go the same distance at the same speed. It helps to improvise a couple times and notice where you’re starting. If the slide is prominent and in the rhythm track, you can try one of my tricks, which is to start Guitar 1 from a certain note, such as A in A major, and slide Guitar 2 from C#, so they start in harmony.

Slow, expressive slides are more trouble. These need to start from the same place more exactly. The amount of finger pressure can be a factor in the slide’s sound, too. This is more problematic when that pressure must change as you go, and if the slide’s speed changes. All you can do is practice and be aware of speed, pressure, start and stop point, and the emphasis placed on the destination note (how much pressure and vibrato are you using?).

Bends are tough, too. If you’re not consistent and precise with the speed of your bend, hold, and release, the variation when you double will be out of tune. Quickly bent and released notes can be easier, but don’t count on it. You may be more consistent with a given technique, such as bending with your fingers, the Floyd Rose, or the old tuner trick, but you won’t really know until you try doubling and simply can’t do it. To make matters worse, bending is generally an expressive thing, so being controlled about it may rub you the wrong way. The solution is good technique through practice.

Vibrato usually isn’t an issue because most people tend to use the same vibrato each time they play a line, so you may be in luck here. It tends to be applied unconsciously as well, meaning you’ll do it the same without ever realizing it. Still, make note of what you’re doing and the speed of your vibrato. If the lead is almost painfully slow, with long drawn-out notes and vibrato that starts after a few beats, then changes speeds and vibrato types, these variations create more room for error. Then again, such a lead is so expressive that doubling is probably not wise anyway. This is one reason I didn’t double the final lead guitar on “Epic” (many slow slides were the other)

Finally, extraneous noise in Guitar 1 is hard to duplicate exactly, and why would you want to? If Guitar 1 was perfect except for some weird sound in it, you have ask yourself how important doubling is and how noticeable the sound is. A finger sliding on a string can be easier to duplicate, and if only one side does this, it can be okay. It’s a judgment call. With recording software like ProTools, it’s possible to fix it in the mix, but if you aren’t sure, double-track anyway and worry about it later. You can always turn Guitar 2 (or 1) off. You could also save the Guitar 1 with noise but re-perform it. >Maybe another attempt would be even better – and not have the noise.

If you’re starting to think all of this is an endorsement for speed, because that would reduce bends, vibrato, and slides as issues, not so fast. That’s when timing becomes the biggest issue of all. Without good timing on Guitar 1, you’ll really feel the pain later. Practicing with a metronome, while a good habit, may not help with a troubling passage. Maybe the drum groove or rhythm guitars are slightly off, or DAW-induced latency is disturbing your feel, or you’re just having a bad day and can’t do something right. What to do?

It sometimes helps to hard-pan Guitar 1 to one side while playing it, and/or wear headphones. This way, you can focus on the rhythm section on one side while fitting in your lead notes on the other. Turning down the lead guitar helps, too, for if the lead is too loud while you’re playing, it obscures the timing underneath. For latency, try reducing or eliminating it altogether with a no-latency setting. Be aware that on some days, your sense of timing will simply be different/off, just as you might like a guitar sound one day and think it’s terrible the next. Perseverance is king.

Coda

"Keeping Pace" video

My video for “Keeping Pace” from NOW WEAPONIZED!

If all of this is starting to sound impossible, just wait until Part 2 of this column! Seriously, though, double-tracking is not as hard as it seems. With a little practice it can even be fun, and most of these ideas will help you get a great performance for Guitar 1 anyway. You also might be more ready for doubling than you think. Try doing it a few times and see what your problem areas are, then work on them. Next time, we’ll focus on the more problematic Guitar 2.

Follow Me

Official Site: http://www.randyellefson.com
Twitter: http://twitter.com/randyellefson
Facebook (as guitarist): https://www.facebook.com/pages/Randy-Ellefson-Guitarist
FaceBook (as author): www.facebook.com/RandyEllefsonAuthor
YouTube: www.youtube.com/RandyEllefson

How To Re-Amp Guitars

If you’re like me, you’re not really an audio engineer despite all your research and efforts into capturing high quality sound in your home studio. Though it’s increasingly easy to buy quality gear, that doesn’t mean you have the training or experience to master it. Enrolling in engineering school, sound proofing your house, and upgrading thousands in gear is all time consuming and expensive. Fortunately, there’s an easy and fairly cheap way to record great sounding guitars. It’s called re-amping.

Re-Amping Explained

Re-amping is when you change the sound of a guitar amp on a recording after it was recorded, thus “re-amping” it. In order for this to work, the pre-recorded signal must be the one directly from a guitar. It can’t have already gone through an amp before it was recorded because the sound of that amp is permanently part of the recording. This requires a little planning and at least one special piece of gear.

The chief goal of re-amping is the ability to keep your performance but change the amp’s sound after the fact. This has several advantages:

  • Your great performance doesn’t have to be redone if the original sound quality was poor
  • You can experiment with sounds after performing, too
  • You can re-amp in a pro studio with top gear and engineers, and at a fraction of the cost
  • You don’t have to be loud when recording and yet can still use a loud, live amp

How To Record

Pro Tools 9 running on Windows

Pro Tools 9 running on Windows (Photo credit: Wikipedia)

In the traditional approach to recording, the guitar signal goes through any effects you’re using, into your amp and then out the amp’s speakers. Microphones then transmit this sound to tape, often after the signal passes through studio effects. All of this happens in a soundproofed room with expensive gear.

With re-amping, the process is different. The signal from your guitar may still go through your effects, but most of this should be avoided. You can still add these effects later during re-amping. The exception to this is the wah pedal, since your performance is both your hands and what you’re doing with that pedal, but this can also be added during re-amping, though it can feel weird to do so.

The signal from your guitar should go into a direct box such as the SansAmp XDI, which converts the guitar’s high impedance output to a low one required by mixing consoles. It also reduces the chance of electrical disturbance from nearby objects.

After this, you have to get your signal into your recorder somehow. There are many options for this but since I’m no expert, I will focus on computer based recording as I did it on my new album, Some Things Are Better Left Unsaid. You should still be able to take the principles and apply them to your own situation.

My Setup For Recording

If you’ve already got a computer based recording system, you already have an interface for getting signals directly into your computer software. In my case, I am using Digidesign Pro Tools LE with the Digi 001 interface for it. The signal from my guitar goes through the direct box and then straight into one of the Digi 001’s inputs. From there the signal goes into the computer and Pro Tools.

There are two basic kinds of tracks I use in Pro Tools: Audio and Aux. The Audio tracks are where the guitar is actually recorded, but I don’t always want to record. Sometimes I just want to play along with other recorded tracks, and even when I do record I want to simply flip a button or two and be ready to roll, so I have several Aux tracks set up:

  • “Play” Aux (Stereo) – takes the guitar input and routes the signal to “Amp” Aux. No effects.
  • “RecordGtr” Aux (Mono) – takes the guitar input and routes it to bus 4 (the input for all Audio tracks). I can also control the level sent to Audio tracks with this. No effects.
  • “Amp” Aux (Stereo) – receives input from either “Play”; or “GuitarLeft” and/or “GuitarRight”, and routes output to “GuitarMaster”. Has noise gate and amp simulator plug-in on it.
  • “GuitarMaster” Aux – receives output of “Amp” and adds reverb.

Of course, in addition to these, I have the actual Audio tracks for however many guitars I need. Let’s keep it simple and say it’s two rhythm guitars: right and left. So I also have this.

  • “GuitarLeft” Audio (Mono) – receives input of “RecordGtr” on bus 4, and routes to “Amp” Aux. No effects.
  • “GuitarRight”. Same. One is panned left, the other right.

Since I generally perform rock music, I want it to sound distorted, so how do I do that without using an amp? I use an amp simulator. In my case, it’s the SansAmp PSA-1 software plug in that now ships with Pro Tools. This is only found on the “Amp” Aux track (indicated by “SAP1” on the picture).

You’ll notice there are no effects on any of these except “Amp” and “GuitarMaster”. This means the signal from the guitar is going to the hard drive bare as the day it was born. Only after that is it routed into effects. This is how you preserve the original signal and still hear distortion or whatever effects you have loaded on your DAW (Digital Audio Workstation) as you perform. You simply place these effects after the audio tracks in the signal chain.

To go from playing along to recording, all I have to do is mute “Play”, record enable an audio track, and hit the record button. The latter two steps are mandatory for everyone anyway, so with this setup I have only one extra button to push. When recording a guitar hard panned to one side, I usually want to hear the guitar on both sides, so instead of muting I often just changing the panning on the “Play” track to be opposite of the recorded track, and these can include anything from flangers, to a chorus, reverb, delay, phaser, EQ, etc.

Re-Amping

Now that you’ve recorded your masterpiece with the raw guitar signal, hearing a workable amp tone in the process, it’s time to change your mind about what it sounds like. This is the real power of re-amping!

The simplest version of re-amping is this: launch the amp simulator, turn the dials, and viola: you have re-amped. If you really want top level results, however, nothing substitutes for a real amp cranked up and recorded with high quality gear by an engineer who knows far more than you do about what he’s doing.

There’s nothing unusual about this, with one exception. Just as you used a direct box to change the impedance and otherwise improve the signal quality going into your computer, you now need something similar to reverse it. The Radial X-Amp is designed for this purpose, and the pro studio may already have one. You just route the signal from the mixing console into this and out the other side, and then straight into your amp unless you want to go through your pedal board first, for example. Otherwise it’s pure traditional recording, except you’re twiddling your thumbs in the control room instead of sweating over your performance and how much your multiple takes are costing you. You and your engineer are also able to tweak your amp sound to fit better in the mix with the drums and bass.

When I re-amped my album, I decided to add a wah to one lead guitar phrase and easily did so simply by placing the wah before the amp in the signal path, just like normal. My engineer set this up so that I stood in the control room while doing it. If I had wanted to add other traditional pedals, such as a phaser, I could have done this, too, but I ended up using studio effect instead partly to further keep my options open.

Another cool trick we did was simulating the sound of a guitar with the volume knob turned down. We just turned down the volume control on the X-Amp. It sounded exactly like turning a guitar knob. I had recorded the performance (the opening riff of the sound clips below) at full volume.

Coda

"Moshkill" Video

My video for “Moshkill” from NOW WEAPONIZED!

In the independent artist community, there’s a lot of enthusiasm for doing everything yourself, like a badge of honor, but don’t get too swept up in this like I once did. You might be a better engineer than me.  I never kept track of the hours I spent recording Some Things Are Better Left Unsaid, but if done in someone else’s studio at a cost of $60, it would have cost thousands. I also would’ve had to record on someone else’s schedule and availability. Re-amping stereo riffs and a single lead guitar on ten songs only cost me $700. That’s $70 per song, or the equivalent of spending only about 1 hour to perform all the guitars on a song, not to mention setup and tuning. That’s hard to beat.

Follow Me

Official Site: http://www.randyellefson.com
Twitter: http://twitter.com/randyellefson
Facebook (as guitarist): https://www.facebook.com/pages/Randy-Ellefson-Guitarist
FaceBook (as author): www.facebook.com/RandyEllefsonAuthor
YouTube: www.youtube.com/RandyEllefson

Structural Chord Progressions

A good way to make songs more powerful and structurally sound is to use chord progressions not only within sections, but also across them. This creates a harmonic relationship between sections and adds to the sense of forward motion, tension and resolution, and overall strength. A change of section can feel more logical and expected, which you can also use to your advantage by doing something harmonically unexpected.

Progression Vs. Succession

First, we must define chord progression. Since there are two ways of placing chords side-by-side but only one term, “chord progression”, everyone calls both versions the same thing. Let’s call the second version, “chord succession”.

In a chord succession, none of the chords have a relationship to the others except that first one and then another is played in succession. Playing E5, D5, and C5 ala Iron Maiden is a good example. Since nothing is going on, there’s nothing to define. It’s not even clear if this is E minor or C major.

Chord progressions, by contrast, are so involved that books are written on them, so we’ll just cover the relevant basics. It is their nature to solidly define a key by concluding with V-I (the key’s fifth chord and first one). The chords of increasing tension precede the chord of no tension, which is therefore the ultimate resolution. Several other chords can precede V-I, such as the famous IV-V-I (D, E, A). This defines the key as A major, provides tension and resolution, and moves (or progresses) the song forward purely by harmony. Let’s use the IV-V-I progression for structure.

Song Structure

So what do I mean by structural chord progression? Let’s say your song has a verse, bridge, and chorus. We’ll decide our song, overall, is in A major despite any key changes within the song. To do a structural progression, we would write the verse in A major (I), the bridge in D major (IV), and the chorus in E major (V). After the chorus, we conclude the progression by returning to the verse in A major (I). See Example 1.

In this example, the indication (V/IV) means “V of IV”, and that A major is not only I in A major, but also acts as the V chord in D major, our next key. Simply by concluding our verse on an A major chord and starting the bridge on a D major chord, we go V-I into D major.

After the verse (I), we continue forward with the bridge (IV) and chorus (V) again (Example 2). At this point, we could either return to the verse music again, or go straight into a solo in A major, but that key is sort of expected at this point, isn’t it?

Why don’t we do something unexpected, such as resolving to A minor (i) instead? It’s a nice surprise, a different tonality (being minor), and is also something we haven’t heard.

The technique can continue within a solo. To determine what keys to use, decide what section (and key) will come after the solo, then work backwards. In our example, the E major chorus comes after the solo, so it makes sense to end the solo in B major. B is V of E and makes E sound like home.

For this reason, at the coda in Example 3, we remain in E major instead of return to A major. By this point, E sounded like home anyway, and structural progressions have less strict requirements for completion.

What if our song has an introduction? This could be in A major, too, but let’s use E major to create a build up to the main music.

Here’s the final structure of our song and a recording thrown together to demonstrate it (progression jam track mp3):

Caveats

Notice how the chorus has a succession in the first phrase (I-vi-I-IV), but because I slipped in the V chord right at the end before returning to the I chord, this became a progression.

To make structural progressions work, we must clearly define the key of each section. The only way is with a chord progression, for if I were to play all the white keys on a piano, the music could either be C major or A minor, or even modal. It must be definitive.

This raises the problem of using progressions constantly when they are all very similar, which is why people avoid them in favor of successions. Still, it is possible to ignore progressions and then slip in the V-I or vii-I motion at the end of a phrase. Either that, or do it at the start of a section and then avoid it, such as the entrance to the solo.

Since structural progressions are less strict, a song does not have to conclude with a finished progression, or even maintain them within a song. Two sections can be related by key when no others are. The song above ends in E major, the key of V, but still feels over.

Coda

"Moshkill" Video

My video for “Moshkill” from NOW WEAPONIZED!

This approach can improve your songwriting and make you think of new paths for song development. The effect is often subtle, almost psychological, and yet helps retain a grip on your listener, something every composer wants. This technique and others can be heard throughout the songs on my album, The Firebard.

Follow Me

Official Site: http://www.randyellefson.com
Twitter: http://twitter.com/randyellefson
Facebook (as guitarist): https://www.facebook.com/pages/Randy-Ellefson-Guitarist
FaceBook (as author): www.facebook.com/RandyEllefsonAuthor
YouTube: www.youtube.com/RandyEllefson

Interval Riffs, Part 3: Simple Counterpoint

Counterpoint is defined as two or more simultaneous melodies that maintain their independence while still forming a harmonic relationship. A single instrument like classical guitar can perform counterpoint with three or four lines seeming like a single part. However, rock guitarists seldom do this for a variety of reasons, but that doesn’t mean it can’t be done.

In Part One and Part Two, we examined intervals, how to write riffs with them, and different ways to melodically ornament them. The two main intervals were fifths and thirds, with each having neighbor and/or passing tones. Now we’ll go further to using mixed intervals and introduce two basic ideas in counterpoint: oblique motion and contrary motion.

Mixed Intervals

So far we’ve been using three implied chords: E minor, D major, and C major, in that order. The lower line has also been E, D, and C, and the main interval has either been thirds or fifths. What we’ll look at now is retaining that bass line, but changing what interval is above it. Take a look at Example 1.


Example 1

Using three different intervals, a third, fourth, and fifth, we have this riff as performed in Example 2:

The upper part remains on G while the lower line descends. As this happens, the G forms an E minor third with the E below it, and when the passage ends, a fifth with the C below it. G is a common tone for E minor and C major (it is in both the first and last chords).

In between at measures 5-6, while the lower note is D, G seems like a non-chord tone. After all, the notes of D major are D, F#, and A. There’s no G, but we’re playing it anyway. There are two interpretations.

One: G is a non-chord tone that works with D because G is in the chord before and after it. This makes the temporary dissonance of G not being in the chord smoother.

Two: The chord has changed from D major to being G major in second inversion (i.e., the fifth, D, is the lowest note). G major is spelled G, B, and D. Any time you’re playing a perfect fourth, the higher note is the root, as if it’s a root-fifth-octave voicing without the lower root (Example 3).


Example 3

Simple Counterpoint

In previous articles, when using thirds or fifths, we were always doing parallel motion, which means the two notes were a third apart on the first chord and remained that way as the notes moved to other chords (Example 4). Fifths were always a fifth apart.


Example 4

Now, one line moves and the other one doesn’t, which is called oblique motion. It might seem that less note movement would be less interesting, but both oblique and contrary motion create a sense of depth and space within the guitar part. The stationary note causes the following changes in this case:

  1. There are two independent parts.
  2. Three different intervals and sounds are used: a third, fourth, and fifth
  3. The chord changed from D major to G major, which also gives the bassist two options: playing D or G. If you listen carefully to the mp3s, you will hear the bass move from D up to G and then walk down to the C chord

A good use of oblique motion is to perform a V-I progression, since the fifth note of a key is in both chords. In E minor, that note is B. The V chord of B major is B, D#, F# and I chord of E minor is E, G, B). You can hold down the B while alternating the E with a D# (Example 5).


Example 5

Contrary Motion

When two lines move in opposite directions, it’s called contrary motion. This technique is useful for switching between a third and fifth in particular.


Example 6

A fifth can collapse inward to a third if the lower note moves up a step and the higher note falls a step. In doing this, C and G become D and F# respectively, so a fifth becomes a third and the chord changes from C to D. The reverse works just as well, so a third can expand outward to become a fifth (Ex. 6).

Another application in E minor or major is for the V – I progression, B major to E, as in Example 7. Here, the low B drops to the open E while the D# rises to another E, so a third becomes an octave. We can also add another B on top and leave it there for both chords (Ex. 7b). This sounds richer.


Example 7

Putting It All Together

If we combine the ideas in this article with the ornamentation ideas of the last article, we arrive at a riff like that in Example 8. This uses mixed intervals, upper and lower neighbor tones, and parallel, oblique and contrary motion. Notice the last beat of measure 8, where C5 collapses to D3, which then rises in parallel to Em3. Hear the mp3, where the bass guitar line outlining the G chord.


Example 8

Coda

"Keeping Pace" video

My video for “Keeping Pace” from NOW WEAPONIZED!

Counterpoint is a simple way to add depth to your parts for a more spacious, richer guitar riffs, especially when combined with mixed intervals. In subsequent articles, we’ll go through the song “Motif Operandi” from my first album, The Firebard, riff by riff to see these applications and variation techniques in practice.

Follow Me

Official Site: http://www.randyellefson.com
Twitter: http://twitter.com/randyellefson
Facebook (as guitarist): https://www.facebook.com/pages/Randy-Ellefson-Guitarist
FaceBook (as author): www.facebook.com/RandyEllefsonAuthor
YouTube: www.youtube.com/RandyEllefson

Interval Riffs, Part 2: Ornamentation

In a previous article, Interval Riff Basics, we looked at and heard examples of using only two notes, or intervals, for rhythm guitar parts. The two main intervals are fifth and thirds, with the latter adding more variety and color to your riffs. Now we’ll look at ornamenting these two basic sounds with melody fragments. Doing so also introduces other intervals, including seconds, fourths and sixths, but each will be subservient to our core intervals of the third and fifth… at least for now.

Ornamenting Thirds

There are two types of notes in music: chord tones and non-chord tones. Our ornamentation will be done with non-chord tones, specifically the one called a “neighbor tone”. A neighbor tone is next to a current chord tone, and is approached and left in opposite directions. For example, if holding an E minor third (the notes E and G), and the upper note, G, drop down to F#, and then back up to G, the F# is a neighbor tone. See Example 1a.

In this case, the F# is a lower neighbor. There is also an upper neighbor, which would be A. See Example 1b. Listen to this example of thirds ornamented with lower neighbor tones. Within the example are major thirds, a minor third, and major seconds, as shown in Example 2.

Notice how there is a constant eighth-note pulse on the 5th string throughout this example, and that an interval of one kind or another is only sounded at certain accents, when both notes are sounded. At that moment, the muting from the right hand is lifted so the chord can be heard. This brief moment is one reason the relatively dissonant interval of a major second (E and F#) works. If you were to sound the major second and let it ring longer, it sounds much more dissonant.

Example 3 and its accompanying mp3 use both lower and upper neighbors to create a more active line. Of special note is the last measure, where an F# was used because it is in the key. With the C below it, it creates an augmented fourth, which usually sounds like it should resolve upward by step to the fifth, which is the case here. The F# is also a passing tone, not a neighbor tone, and such a motion is discussed below.

Ornamenting Fifths

Just like thirds, fifths have both a lower and upper neighbor. The lower neighbor is usually a perfect fourth, while the upper one can be either a minor or major sixth, depending on where you are in the key. See Example 4.

In most of Example 5, the perfect fourth is used, but listen again for the augmented fourth (the F#) above the C, as expected by the key of E minor. It is possible to use the perfect fourth above C and introduce an F natural.

Connecting Thirds and Fifths

To connect a third with a fifth above the same root, such as E, another kind of non-chord tone is used: the passing tone; in this case, a fourth. A passing tone is approached and left in the same direction. For example, with E on the bottom continuously, G can pass through A on its way to B, moving from the interval of a minor third, through a fourth, to a fifth. The opposite direction works equally well. See Example 6.

Of course, it’s not necessary to connect the third and fifth at all. You can simply alternate.

This final mp3 illustrates a riff connecting thirds and fifths as in Example 7.

Coda

Adding ornamentation is a good way to introduce melody to your rhythm guitar parts, but we’ve only scratched the surface of what can be done. In a future article, we’ll explore counterpoint and see how to write two different lines for one guitarist to play alone.

In Part Three, we introduce counterpoint.

To hear and see some interval riffs in an actual song of mine, watch this video of my song “Crunch Time”. The riffs are in the upper left guitar part onscreen.

Video for "Crunch Time"

My video for “Crunch Time” from NOW WEAPONIZED!

Follow Me

Official Site: http://www.randyellefson.com
Twitter: http://twitter.com/randyellefson
Facebook (as guitarist): https://www.facebook.com/pages/Randy-Ellefson-Guitarist
FaceBook (as author): www.facebook.com/RandyEllefsonAuthor
YouTube: www.youtube.com/RandyEllefson

Interval Riffs, Part 1: Basics

Many guitarists use chords for rhythm guitar without considering another option: intervals. While a chord is three (or more) notes, an interval is only two. This might seem a trivial difference, but using just part of a chord lets you play intervals for specific reasons, and using only two fingers creates other more advanced possibilities. Let’s take a look at chords and see the two main intervals at our disposal.

Chords

It may seem that with only two pitches, the sound would be thinner than a chord, but hard rock and metal players have been going with two notes for decades. A healthy distortion more than makes up for it.

The full barre chord is already avoided mostly because many players feel the higher notes don’t sound good with distortion. Significantly, one of the higher pitches omitted is the chord’s third. In theory, all chords have at least a root, third, and fifth. Simply put, the third is what makes a chord major or minor, so without it, you have a somewhat empty voicing, which is why it sounds more stable and more powerful (not less) with distortion.

Consider the case of the octave, which is the same note at a higher or lower pitch. All octaves are “perfect”, and along with the unison, are as stable as an interval can be. Similarly, the fifth is also perfect (usually) and also very stable. When distortion is added, this stability is exaggerated. This is why the “power chord” of root-fifth-octave is a “can’t miss” voicing that always sounds strong.

In the same way, the sound of a third is also exaggerated, but it is a less stable interval, a fact that becomes increasingly apparent if the interval is held alone for several seconds. The interval will “shake” just like when you’re tuning the guitar, a dissonant effect that is tolerated by some listeners more than others. It is less noticeable in the midst of a larger chord, but with the third removed, stability is easier.

Intervals

If a rhythm guitarist is not going to play chords or single notes, there are several intervals to choose from (this list is presented in the order of increasing dissonance and decreasing stability):

  •   perfect octave or perfect unison
  •   perfect fifth, perfect fourth
  •   major third and major sixth
  •   minor third and minor sixth
  •   major second and minor seventh
  •   major seventh, diminished fifth, minor second

Our purpose is to use parts of a chord instead of the entire thing, so our two main choices are fifths and thirds. The other intervals will still be used when we get to ornamentation, but let’s have a look and listen to our core intervals.

Fifths

For most guitar players, the fifth needs no introduction. It’s what you get when you only play the two lowest notes of a barre chord (Example 1).


Example 1

As shown in the example, some also play the octave, which adds some brightness and stability but otherwise has no effect. This is one reason many people don’t play it, especially in heavier or darker music. Another reason to omit the octave is that, instead of using your pinky for that note, your pinky can hold down the fifth, which is a more comfortable hand position for many.

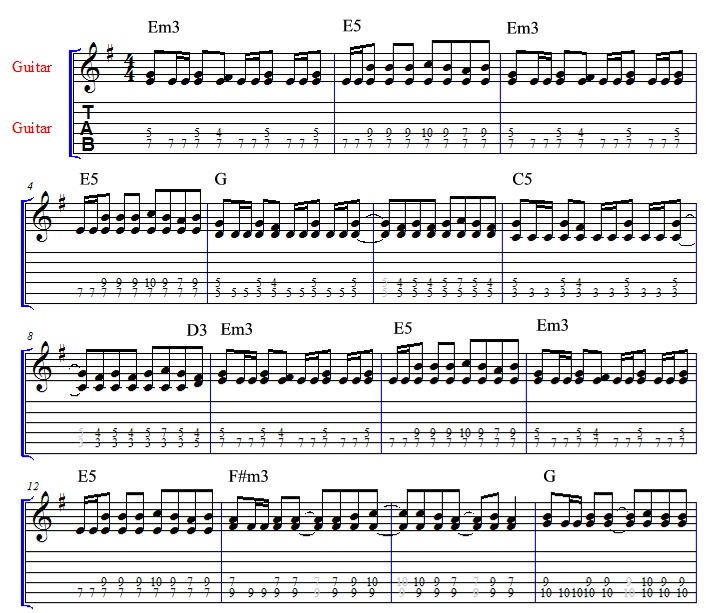
One advantage is that in standard tuning, the same hand position can be moved around the guitar neck without much thought. All a player has to do is know which notes are in the key, put the index finger there, and retain the same hand “shape”. This has one unintended side effect, however. There is always one diminished fifth, not perfect fifth, in a key, but players tend to ignore this as if a fifth is a fifth is a fifth. In E minor, for example, the F# voicing should include a C natural, but most players use C#, introducing a raised sixth scale degree to the music (Example 2). This is fine, but be aware that this might affect lead guitar work.


Example 2

You’ve probably heard this before, but for comparison, listen to this simple riff using all fifths. (5ths.mp3) The second mp3 is identical except it includes the octave as well. It should sound slightly brighter (5thsWithOctave.mp3).

Thirds

Thirds played alone are not very common, which is odd because thirds are the building block of chords, and one would expect to see them frequently. We can only guess the reason is the aforementioned effect of distortion, but the more likely reason is that no one purposely omitted the third when avoiding a barre chord’s higher notes, so they haven’t purposely played it alone either.

A big advantage to thirds is that they are richer intervals, with more tone color. They are moodier, more dramatic, and thicker (3rds.mp3). In this mp3, the intervals are E minor 3rd, D major 3rd, and C major 3rd, as shown in Example 3.


Example 3

Thirds come in two varieties: major thirds and minor thirds. This is more diverse than playing a perfect fifth everywhere, but is also one deterrent to using them. To play and/or write an entire riff in thirds, you must know which one you’re supposed to play as you move through a key and change your hand shape accordingly. If a full chord would be minor, then you want to play a minor 3rd at each of those points. The same is true of major thirds. In E minor, the first, second, fourth, and fifth intervals would be minor, and the third, sixth, and seventh intervals are major: E minor, F# minor, G major, A minor, B minor, C major, D major.

The tonality of major or minor is immediately apparent, which can be useful for making a noticeable key change, such as from E major to E minor. If you were to do this with fifths in the rhythm, the change wouldn’t be noticed at first. In addition, if you want to play an unexpected sound, such as using an E major chord where an E minor one is expected, using a third easily accomplishes this.

Like the fifth, thirds can also be played with the octave included (Example 4). Unlike the fifth, a third has more than just added brightness this way, for the character is changed somewhat (3rdsWithOctave.mp3). This shape is unusually difficult to move around the guitar.


Example 4

As mentioned earlier, the third is less stable than a fifth and sounds less desirable the longer it is held. One trick for using it successfully is to play it briefly. While this might seem too limiting, consider that many metal players have a palm-muting style like the audio examples. Notice how the interval is momentarily sounded in between muted 8th-notes, meaning it never has the chance to deteriorate. On the repeat, the interval is held open longer to provide a clearer example of the sound.

As a final note, thirds become muddier and less useful lower on the guitar, but this can be overcome with the above technique.

Alternating Intervals

Switching between thirds and fifths can help provide variety within a riff and between two music sections. One simple trick is to take the same chord succession and do it twice: once using fifths and once with thirds. Another is to write two sections of music where the first interval is different. This helps creates separation between musical ideas.

Much more elaborate things can be done with intervals, as will be demonstrated in future articles, but to give you some idea, listen to these all-interval riffs from my album, The Firebard (Motif_Operandi.mp3).

Coda

"Moshkill" Video

My video for “Moshkill” from NOW WEAPONIZED!

Though chords and fifths are frequently used, the addition of thirds to your repertoire will give you other options, which is always a good thing. We’ve only touched the surface of interval riffs, but this simple technique can be the foundation for an empire of ideas. Stay tuned for more…and be sure to read Interval Riff Ornamentation.

Follow Me

Official Site: http://www.randyellefson.com
Twitter: http://twitter.com/randyellefson
Facebook (as guitarist): https://www.facebook.com/pages/Randy-Ellefson-Guitarist
FaceBook (as author): www.facebook.com/RandyEllefsonAuthor
YouTube: www.youtube.com/RandyEllefson